Hotel Blacklist
The Hotel Blacklist plugin allows Buyers to define business rules to control how Search requests are executed across different suppliers. It is especially useful when working in aggregator mode with FastX codes, where a single Search request can be sent to multiple suppliers at the same time.
With this plugin, Buyers can allow or block search traffic to specific hotels or suppliers based on configurable criteria. These rules are managed through the Hotel Blacklist App, which is already pre-installed and ready to use for you in the "My Apps" section of the Travelgate Store.
This provides fine-grained control over which suppliers are queried in each Search, helping Buyers apply commercial and operational rules directly in their booking flow.
Typical use cases
Some common scenarios where the Blacklist plugin is especially useful include:
-
Blocking traffic from a specific nationality to a given supplier
For example, prevent searches from users with nationalityFRfrom being sent to supplierSUP1. -
Allowing searches only for a defined set of hotels for a specific access
For example, restrict an access so that Search requests are executed only for a predefined list of FastX hotel codes. -
Excluding a supplier for certain countries or markets
For example, avoid querying a supplier when the hotel country isUSorBR. -
Controlling supplier participation when using FastX aggregation
For example, when multiple suppliers provide the same hotel, allow only selected suppliers to be queried based on your commercial strategy.
These rules are evaluated dynamically at Search time, giving you full control over how your availability requests are distributed across suppliers.
To use the Blacklist plugin, you need to:
- Manage your Blacklist rules (via the Travelgate Store App or by uploading a file via SFTP).
- Add the plugin to your Hotel-X Search query.
1. Manage your Hotel Blacklist Rules on our Travelgate website
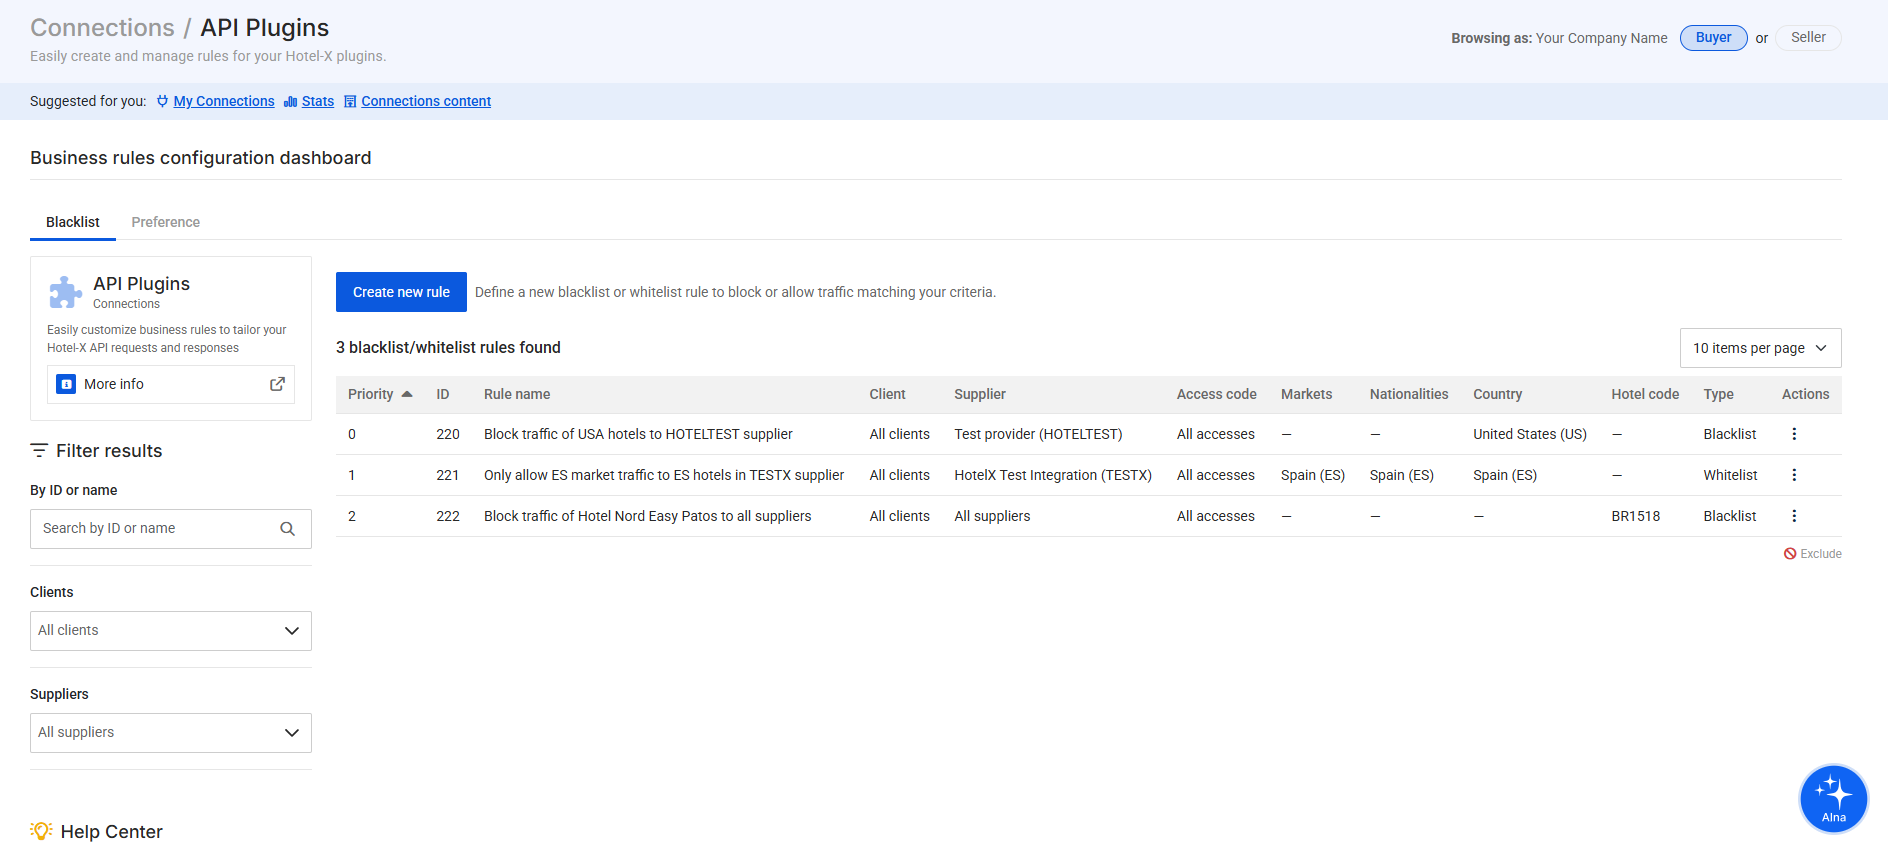
Hotel-X will block the traffic according to the Blacklist rules you create using the Hotel Blacklist App. This app is already pre-installed and ready to use for you in the "My Apps" section of the Travelgate Store.
Within the app, you can:
- View all your existing rules.
- Create new rules.
- Edit or delete rules.
- Change the priority of rules.
Creating or editing a rule is done through a simple 3-step form in the Hotel Blacklist App. Each step defines how and when your rule will be applied.
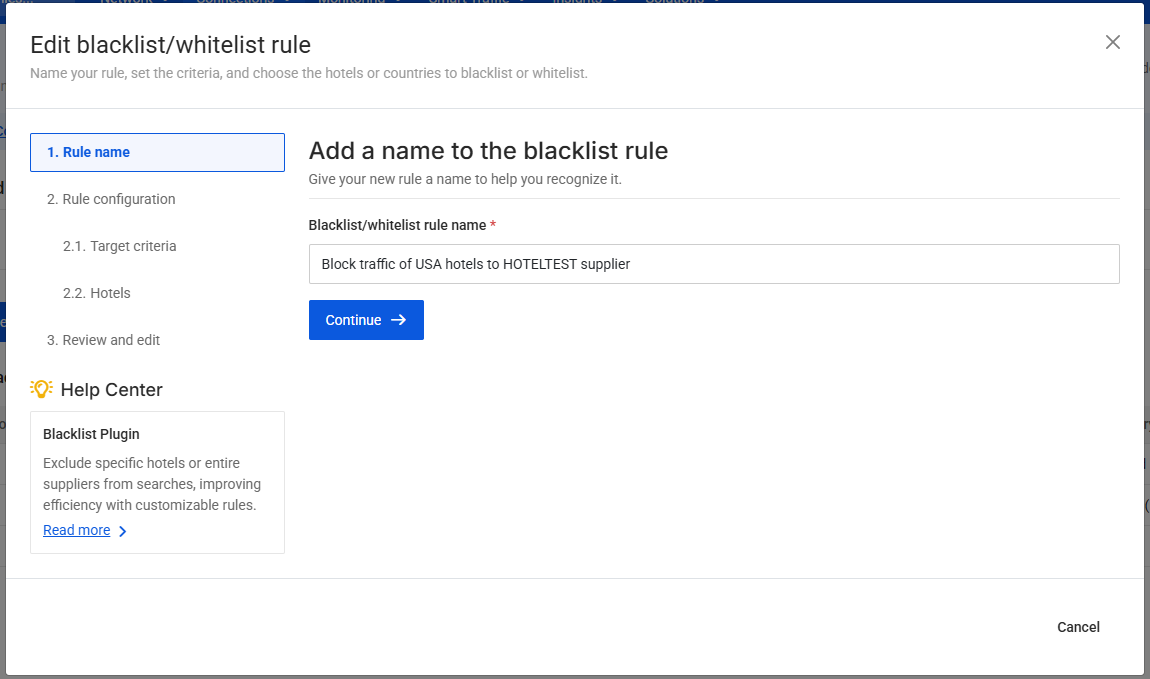
Step 1. Rule Name
Provide a clear and descriptive name for your rule. This will help you easily identify it later when managing priorities or reviewing existing rules.
Step 2. Rule Configuration
This step defines both the conditions under which the rule applies and the scope of hotels affected.
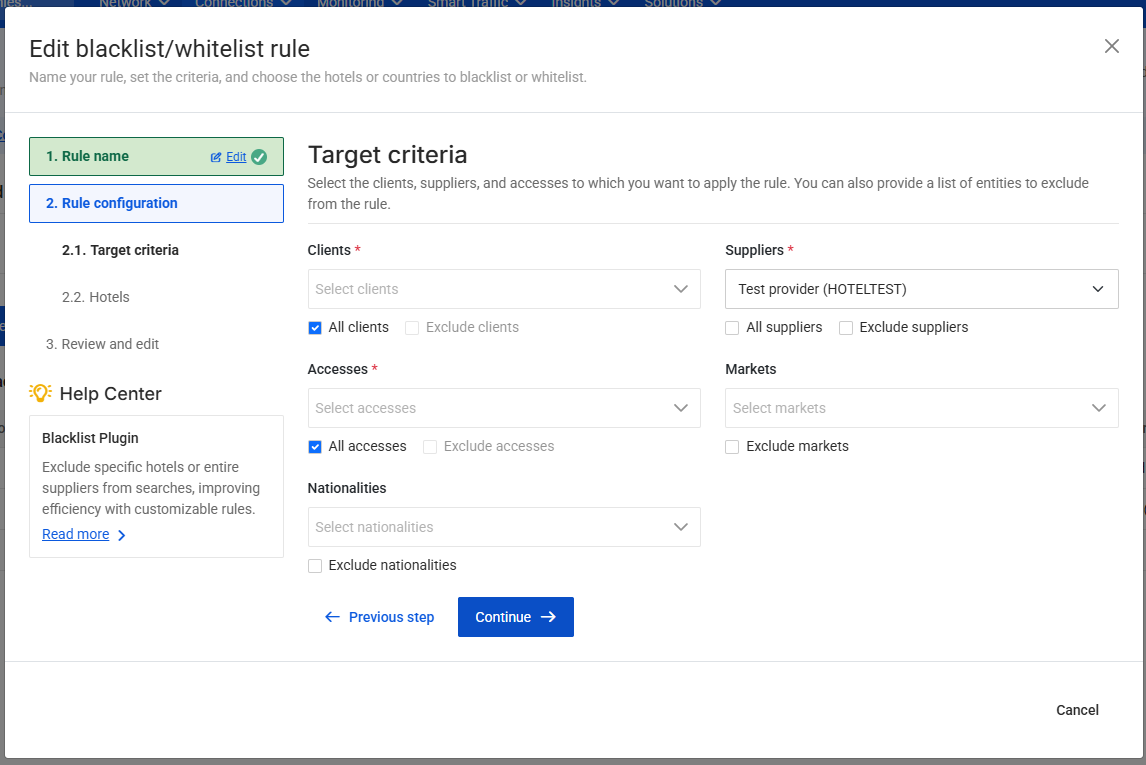
2.1 Target Criteria
This section defines the conditions that must be met in the Search request for the rule to be applied.
Only when these criteria match the incoming Search request will the Blacklist or Whitelist behavior configured in the next step be executed.
- Clients
- Suppliers
- Accesses
- Markets (optional)
- Nationalities (optional)
You may select all clients, suppliers or accesses, or restrict the rule to specific ones.
Using the exclusion checkboxes, you can also apply the rule to all except the selected clients or suppliers.
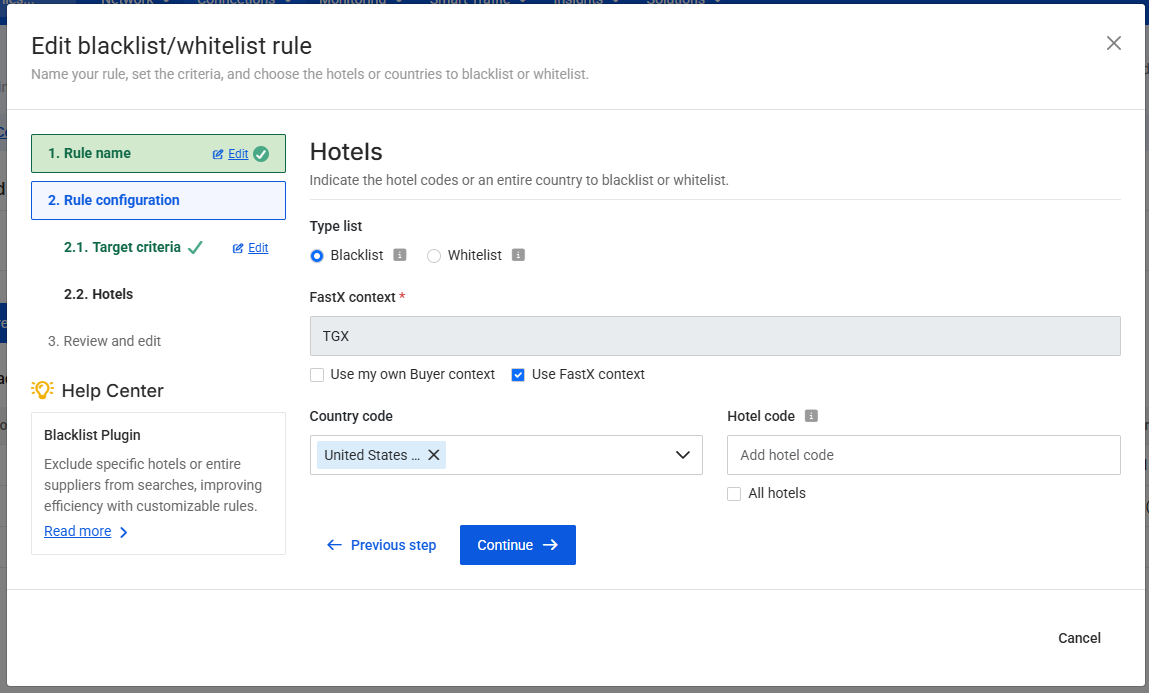
2.2 Hotels
This section defines what action will be applied once the conditions specified in Step 2.1 are met.
In other words, after a Search request matches the target criteria, this configuration determines how traffic will be allowed or blocked and which hotels are affected.
Here you can configure:
-
List type
- Blacklist: blocks traffic for the selected hotels.
- Whitelist: allows traffic only for the selected hotels and blocks all others.
-
Buyer context
- Select the context in which the rule applies.
- If you are using FastX codes, make sure to enable the FastX option.
-
Hotel scope
- All hotels
- A specific list of hotel codes within the previously selected context
- All hotels located in one or more countries
This configuration gives you precise control over which hotels are included or excluded from Search requests that match the defined criteria.
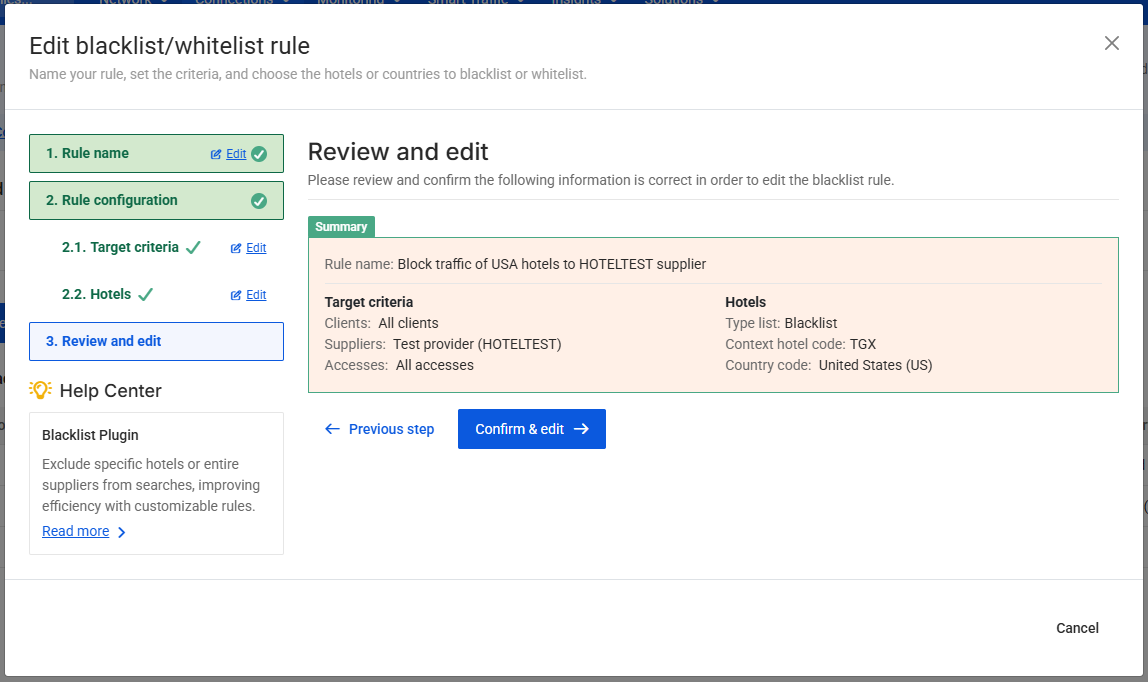
Step 3. Review and Create the Rule
Review all configured settings to ensure they match your intended behavior.
Once confirmed, click Create Rule to activate it.
You can also:
- Edit or delete the rule at any time.
- Change the priority of the rule: Rules are processed in ascending numerical order (lower numbers evaluated first), meaning
priority 0is executed beforepriority 1. Therefore, the lower the number, the higher the priority. - Access logs to track which user created or modified each rule and when the changes occurred.
Optional: Create your Blacklist Rules using a file
You can also create your Blacklist Rules uploading a file to our SFTP server instead of using our website.
To get started, create your blacklist file in the correct format and then upload it to your FTP account. We've provided a template file below ⬇️ to help you with this process. Just click on the file name, add your own rules, save it in CSV format, and then upload it to the corresponding folder in your FTP.
📁HotelX
📁HotelX_0000
📁BusinessRules
📄blacklist_access_hotels.csv
If you need assistance with requesting your credentials to access the SFTP server, determining the endpoint and directory format, or learning how to upload, update, and delete SFTP files, please refer to the overview section of Plugins.
File Format Specification
- File Name: blacklist_access_hotels.csv
- Directory: HotelX/HotelX_0000/BusinessRules
- Delimiter: Comma (
,) - Header Row:
- IdRule: Unique identifier of the rule. You can assign one with the identifier that suits you better.
- ClientToken: List of the client tokens you want the rule to be applied to, separated by
;. This is a dynamic parameter that you can include in your query request if you wish to enforce particular rules from the blacklist. - NoClientToken: List of the client tokens you don't want the rule to be applied to, separated by
;. - Client: List of the specific clients you want the rule to be applied to, separated by
;. - NoClient: List of the specific clients you don't want the rule to be applied to, separated by
;. - Supplier: List of the supplier codes you want the rule to be applied to, separated by
;. - NoSupplier: List of the supplier codes you don't want the rule to be applied to, separated by
; - Access: List of the access codes you want the rule to be applied to, separated by
;. - NoAccess: List of the access codes you don't want the rule to be applied to, separated by
;. - Context: List of the Buyer context codes you want the rule to be applied to, separated by
;. - NoContext: List of the Buyer context codes you don't want the rule to be applied to, separated by
;. - ContextSup: List of the Supplier context codes you want the rule to be applied to, separated by
;. - NoContextSup: List of the Supplier context codes you don't want the rule to be applied to, separated by
;. - Values: Values can be 'blacklist' or 'whitelist' with hotel codes grouped by context. The format is as follows:
- All values should have two blocks separated by the characters
||. - The first block identifies the
contextand the second block identifies the list ofhotel codesseparated by;. - Values in the whitelist or blacklist are separated by the characters
|@|. - Use 'all' as a keyword when you want to choose all contexts or all hotels.
- Format examples:
- Blacklist:
bl:(CTX1||A;B;C|@|CTX2||C;B;D;) - Whitelist:
wl:(CTX1||A;B;C|@|CTX2||all) - Blacklist and Whitelist (if blacklist and whitelist are used at same time, then the CONTEXT must be exclusive):
bl:(CTX1||A;B;C), wl:(CTX2||A;B;C)
- Blacklist:
- All values should have two blocks separated by the characters
Keep in mind that this file contains a collection of rules, and the system will choose the first rule that matches the criteria sent in the query. You must specify the most restrictive rules at the top of the file. If there's no value for any rule criteria row, it means that any value in the request matches this row. Indicate the contexts used in values on the rule criteria to improve rule matching.
📹 Learn how to change the format of the csv file in order to edit and save it
Check Some of the Most Common Use Cases
Here are some common use cases for the Blacklist plugin, along with the CSV template file to use:
| Use Case | CSV Template file |
|---|---|
| Block all hotels of two accesses | 📄blacklist _access _hotels.csv |
| Block all hotels of two suppliers | 📄blacklist _access _hotels.csv |
| Block all hotels except “A” and “B” of two suppliers | 📄blacklist _access _hotels.csv |
2. Execute Blacklist Plugin in your Query
Once you have created your blacklist rules — either via the website or by uploading a file to the SFTP — you can activate the plugin in your HotelX search query.
To do this, add the following field to the settings node of your request. Note that the Blacklist plugin can only be executed during a search query.
step: "REQUEST_ACCESS"type: "PRE_STEP"name: "blacklist"
"settings": {
	"plugins": [
		{
			"step": "REQUEST_ACCESS",
			"pluginsType": {
				"type": "PRE_STEP",
				"name": "blacklist"
			}
		}
	]
}
To apply a specific rule in a query, add the clientTokens field to the settings node of your request:
{
    "settings" : {
        "clientTokens" : [
            "testToken"
        ],
        "plugins" : [
            {
                "step" : "REQUEST_ACCESS",
                "pluginsType" : [
                    {
                        "type" : "PRE_STEP",
                        "name" : "blacklist"
                    }
                ]
            }
        ]
    }
}
Rule Configuration Examples
Below are some common examples of how Buyers use the Blacklist plugin to apply business rules and control Search traffic across suppliers.
Example 1. Block traffic from a specific nationality to a supplier
Use case:
Prevent Search requests from users with nationality FR from being sent to supplier SUP1.
Rule configuration
| Step | Configuration |
|---|---|
| Target Criteria (Step 2.1) | Supplier: SUP1Nationality: FR |
| Hotels (Step 2.2) | Rule type: Blacklist Hotel scope: All hotels |
Evaluation
- If a Search request with nationality
FRis sent toSUP1→ the request is blocked. - All other Search requests are not affected by this rule.
Example 2. Allow searches only for specific hotels on a given access
Use case:
Restrict a specific access so that availability is searched only for a predefined list of hotels.
Rule configuration
| Step | Configuration |
|---|---|
| Target Criteria (Step 2.1) | Access: ACCESS_ABC |
| Hotels (Step 2.2) | Rule type: Whitelist Hotel scope: Specific hotel codes (within the selected context) |
Evaluation
- If a Search request is executed using access
ACCESS_ABC→ only hotels included in the whitelist are allowed to be queried. - All other hotels are automatically excluded for that access.
Example 3. Exclude a supplier for specific markets
Use case:
Avoid querying a supplier when the Search market is US or BR.
Rule configuration
| Step | Configuration |
|---|---|
| Target Criteria (Step 2.1) | Supplier: SUP2Markets: US, BR |
| Hotels (Step 2.2) | Rule type: Blacklist Hotel scope: All hotels |
Evaluation
- If a Search request is sent to
SUP2with marketUSorBR→ the request is blocked. - Search requests for other markets are not affected.
Best Practices for Rule Configuration
To ensure rules behave as expected, always separate clearly:
- When a rule applies → Target Criteria (Step 2.1)
- What the rule does → Hotels (Step 2.2)
The following best practices help avoid unexpected behavior when configuring rules.
Best Practice 1: Group rules with the same target criteria into a single rule
When multiple rules share the same target criteria and only differ by values such as destination country or hotel code, they should be grouped into one single rule.
Because the plugin applies only the first matching rule, splitting values across multiple rules may cause some of them to never be evaluated.
Example: Blocking multiple destinations on the same access
❌ Incorrect setup (multiple rules with the same target criteria)
| Rule | Target Criteria (Step 2.1) | Hotels (Step 2.2) |
|---|---|---|
| Rule A | Access: 387 | Rule type: Blacklist Destination: US |
| Rule B | Access: 387 | Rule type: Blacklist Destination: ES |
What happens:
- The first rule that matches access
387is applied. - The second rule is never evaluated.
- Only one destination is effectively blocked.
✅ Correct setup (single rule)
| Target Criteria (Step 2.1) | Hotels (Step 2.2) |
|---|---|
Access: 387 | Rule type: Blacklist Destinations: US, ES |
What happens:
- Both destinations are correctly blocked using a single rule.
If rules share the same scope and action, always group all values into one rule.
Best Practice 2: Order rules carefully when combining Blacklist and Whitelist rules
When Blacklist and Whitelist rules overlap, rule order is critical. Always place more specific rules first, followed by more generic ones.
Example: Allowing traffic for a specific access while blocking it globally
Business requirement:
- Block all traffic for destination
ESfor supplierSUP1. - Allow traffic for destination
ESonly for access2323.
✅ Correct configuration
| Rule | Target Criteria (Step 2.1) | Hotels (Step 2.2) |
|---|---|---|
| Rule 1 (Whitelist – specific) | Supplier: SUP1Access: 2323 | Rule type: Whitelist Destination: ES |
| Rule 2 (Blacklist – generic) | Supplier: SUP1 | Rule type: Blacklist Destination: ES |
Priority order:
- Rule 1
- Rule 2
Evaluation flow:
- If a Search request for destination
ESis sent toSUP1using access2323→ Rule 1 applies (allowed). - If a Search request for destination
ESis sent toSUP1using any other access → Rule 2 applies (blocked). - Searches for other destinations are not affected.
❌ Incorrect configuration (rules reversed)
Priority order:
- Rule 2 (generic Blacklist)
- Rule 1 (specific Whitelist)
Evaluation flow:
- If a Search request for destination
ESis sent toSUP1→ Rule 2 applies first and blocks the request. - Rule 1 is never evaluated, even when the access is
2323.
When Whitelist and Blacklist rules are mixed, incorrect ordering can completely override more specific rules.